Are you looking to build a dynamic appointment booking website? For those who think it’s hard to deploy, there’s good news – it’s not. Nowadays, you don’t need developers, coders, and designers. You just need the right tools.
In this article, you’ll find out what makes a good appointment website. We’ll take you through the whole site creation routine and hand out the tools we’ve used. In the end, you will figure out how to create a booking system using just OceanWP and several Crocoblock plugins.
What Makes OceanWP & Crocoblock Great Together
- Visual site-building. Since Gutenberg is a visual block editor, website developers can save time switching back and forth between the admin panel and the front-end. It’ll suffice to create a page structure in the editor and ensure the front-end version looks the same.
- Fewer external plugins. Forget about separate plugins for custom post types, forms, booking management, custom fields, etc. To get the appointment functionality up and running, you’ll need two Crocoblock plugins only.
- No middlemen. It means that developers do not have to rely on designers. You can take a demo template by OceanWP, rework its layout as you like, and add Crocoblock dynamic functionality to it.
Appointment Website 101
What is an appointment booking website?
Appointment websites are service-providing platforms where it’s possible to book a particular time slot. Often, these websites offer pay-per-hour services.
What do appointment websites look like?
They can be one-page business card websites, where it is possible to book a particular service from a single provider. On the flip side, appointment websites can house multiple providers. In that case, the website has dedicated Provider and Service single pages and catalogs.
Is it difficult to create an appointment website?
Not anymore. These days, you can build a dynamic website from scratch using the right tools – a page builder you prefer, a theme provider, some dynamic content plugin, and the appointment booking core.
What are the main appointment website elements?
These would be a theme, custom post types, an appointment booking engine, booking forms, Provider pages, Service pages, catalog pages, and listings.
Can I add multiple providers to the same website?
Why not? Several professionals can provide one service. Make sure to assign a provider to the service to avoid confusion at the stage of filling the booking form.
Appointment Website: Basic Preparations
We decided to omit the early-stage preps like getting a domain name and choosing a hosting provider. Instead, we’ll focus on the essence. For those who want to delve into detail, there’s a super informative video by Ferdy Korpershoek.
Get Crocoblock plugins
Crocoblock introduced its updated pricing six months ago. What makes it cool? It’s the Custom subscription plan. Now, to create a workable appointment website, you won’t have to spend much. Go to the Crocoblock pricing page, unfold the JetPlugins tab, and add the necessary plugins to the cart.
You’ll need JetEngine – a dynamic content plugin that allows creating Custom Post Types – and JetAppointment – a service booking WordPress plugin.
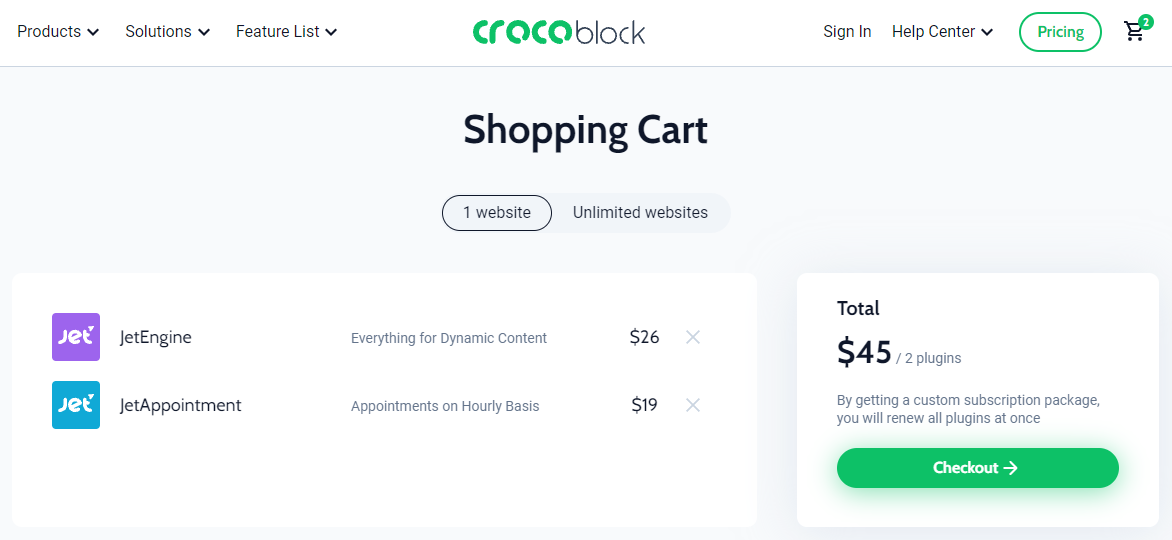
Such a custom package will cost you $45/year for one website and $93/year for unlimited websites. Plus, you’ll be getting plugin updates and quality support for one whole year. Upload these plugins to the WordPress dashboard and get them ready for further work.
Install the OceanWP theme and choose a website template
There are two ways to install the core theme – the traditional one and the Crocoblock way.
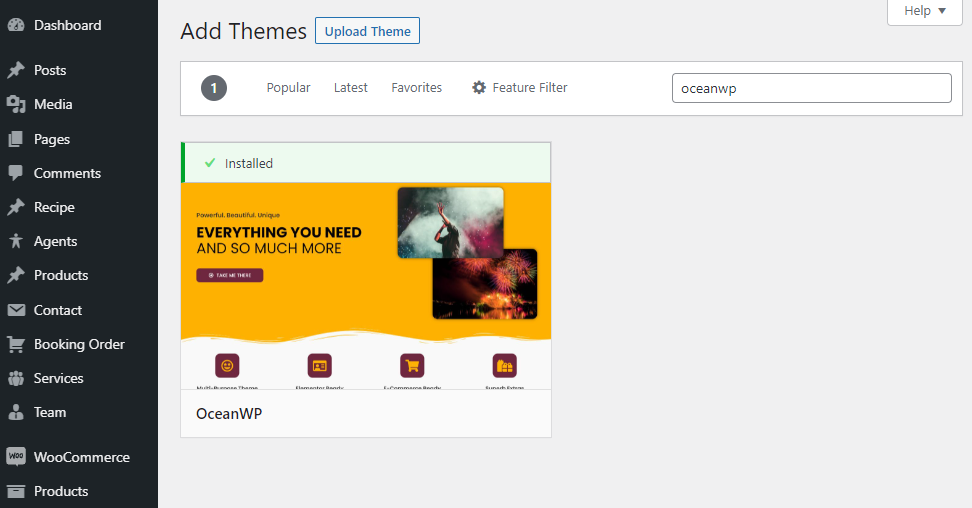
Installing the OceanWP theme the traditional way
Go to Appearance > Themes in the WordPress admin panel and press “Add New.” You can use the search bar to locate the theme. Once found, install OceanWP and activate it.
Installing the OceanWP theme the Crocoblock way
Use the Crocoblock Installation Wizard. It can be downloaded from the Crocoblock account and then used to install OceanWP.
To choose a demo template, go to Theme Panel > Install Demos and pick the one you need. We’ll use the Gym demo template today. Remember that a demo cannot work as intended if some of the premium extensions are missing. You may want to get them first.
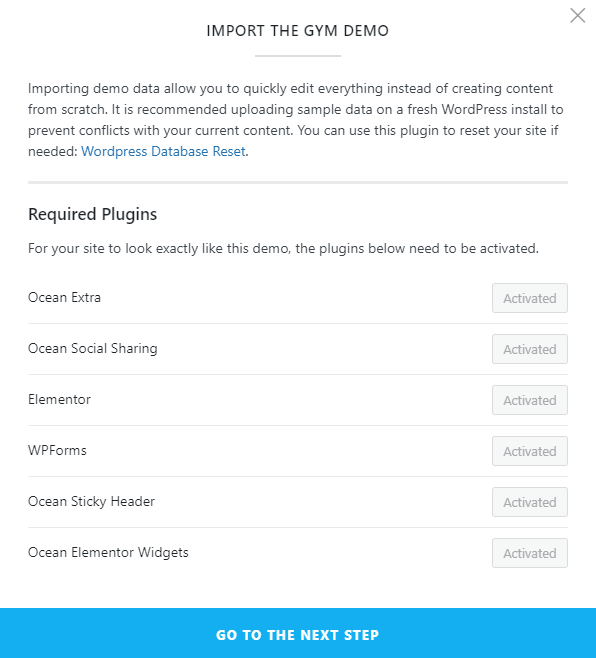
As soon as the demo template installation is completed, you are ready to build a dynamic appointment website.
Building a Custom Appointment Website
Inside every appointment and event scheduling website, there are custom post types for Providers and Services, automated appointment booking core, calendar integration, and a booking form. These are essential elements, but you are at liberty to extend the list however you like.
Now, let’s put JetEngine and JetAppointment plugins to good use.
Custom Post Types creation
Why do you need to create a CPT? They will help you organize the website posts – services to services, providers to providers. Afterward, these posts can be easily interrelated to let the website users book a particular service from those who provide it.
Follow the JetEngine > Post Types > Add New pathway in the WordPress admin panel to create a CPT. Remember that you need two post types – one for Providers and one for Services. Since we are building a Gym website, the post types will be named Trainers and Workouts accordingly.
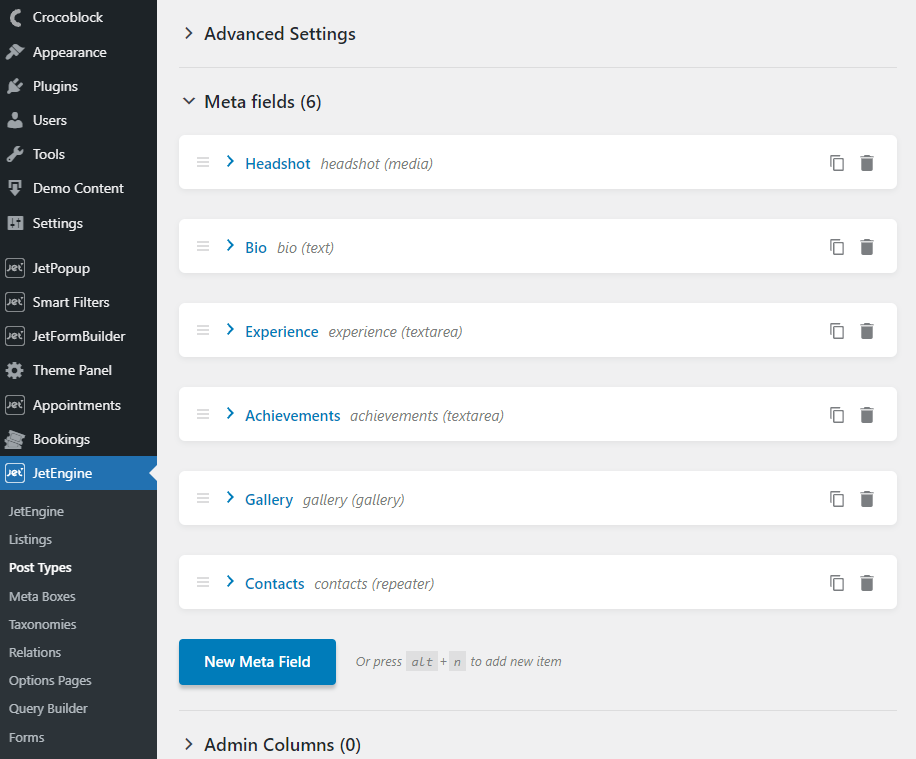
Add the necessary meta fields to both post types. For the Trainers CPT, these could be:
- photo;
- short bio;
- work experience;
- achievements;
- gallery;
- contacts.
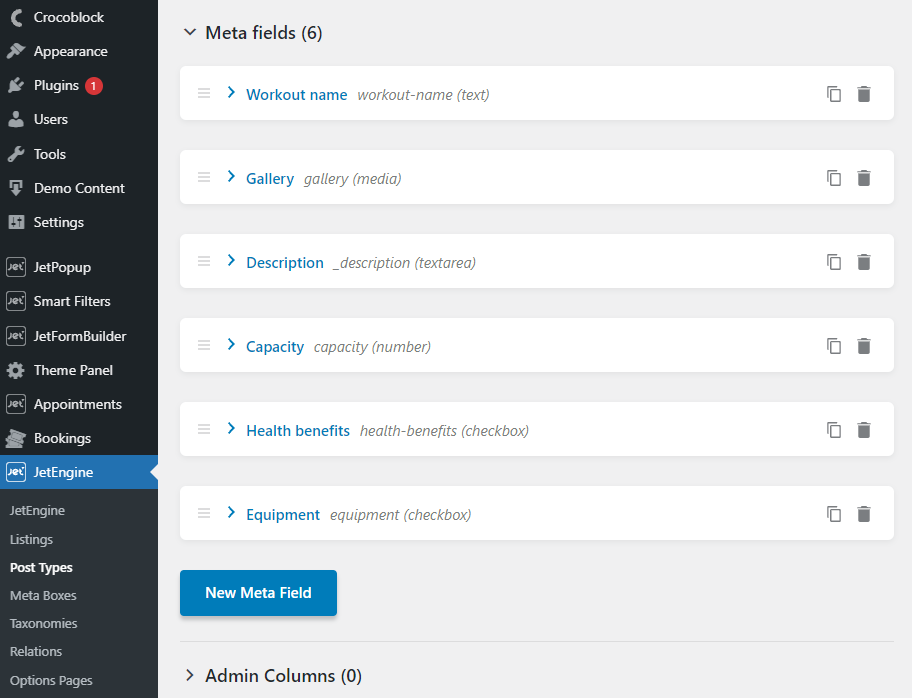
For the Workouts CPT, the meta fields can be as follows:
- gallery;
- description;
- maximum capacity;
- equipment;
- health benefits.
Quick tip: JetEngine has got a useful Glossary feature. It allows you to create a set of meta fields and use them as options for Custom Post Types.
Next, add as many posts to the newly-created Post Types as necessary. To do so, mouse over the CPT name in the WordPress admin panel and then press “Add New.”
Once done, you may proceed to configure the JetAppointment plugin.
JetAppointment setup
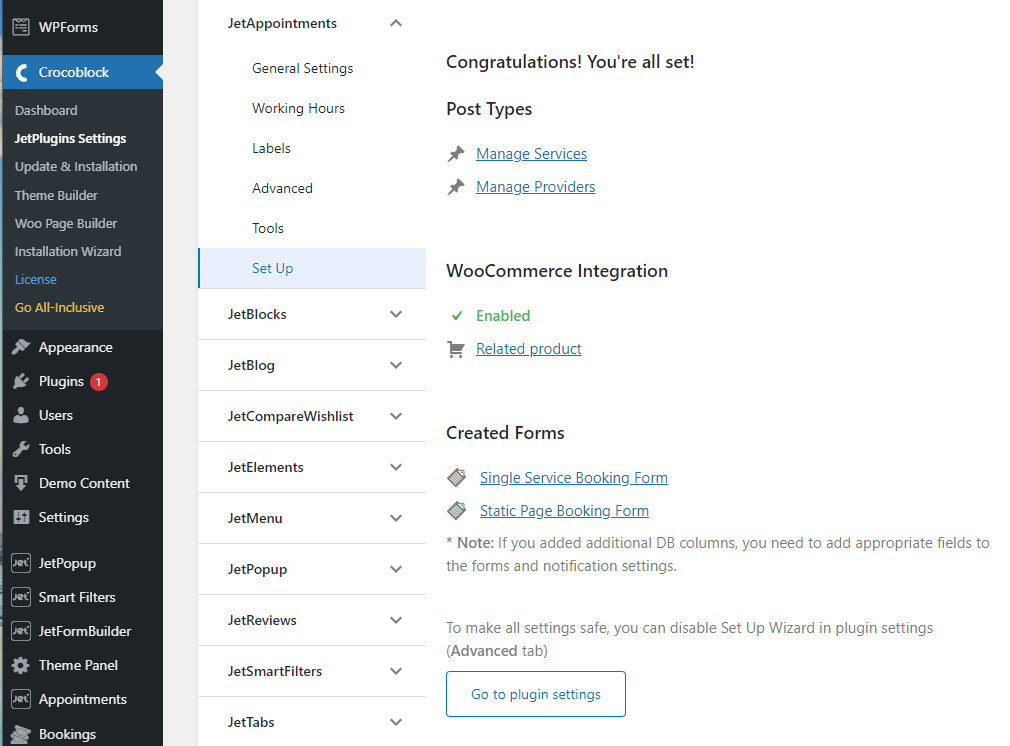
It is not that difficult to set the appointment booking plugin by Crocoblock. All you have to do is run the Setup Wizard and complete four installation steps.
Go to Appointments > Set Up in the admin panel. You’ll be taken to the JetPlugins Settings page, namely to the JetAppointment’s Set Up tab. Click on the similarly named button to run the Wizard.
- Step 1. You need to pick the Services and Providers post types in the corresponding drop-down selects. Don’t forget to enable the Add providers toggle; otherwise, the field won’t appear. Click “Next.”

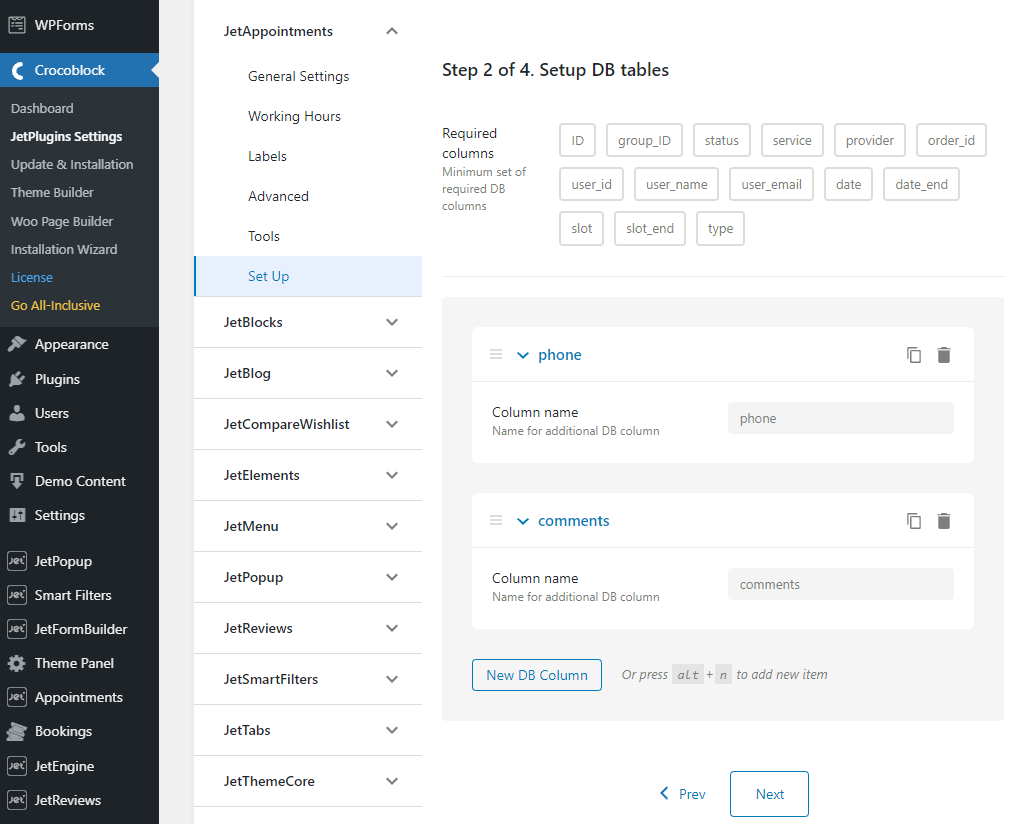
- Step 2. Here, you can see the required database table columns. Continue the installation if you don’t feel like adding more columns. We’ll add Phone and Comments.
- Step 3. This step is dedicated to configuring the service and provider-specific details like duration, buffer time, days off, working hours, etc. For a detailed step overview, please check out this video tutorial.
- Step 4. Lastly, you can integrate WooCommerce and create two appointment booking forms. The available options include “JetEngine Forms” and “JetFormBuilder.” The first is intended for Elementor, and the second is for Gutenberg.
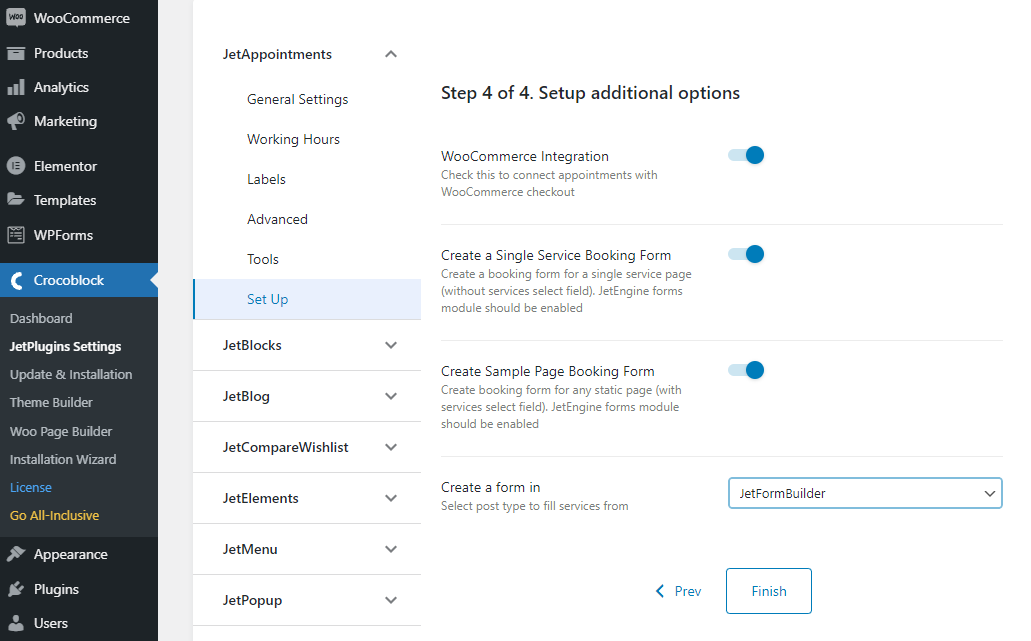
Press the “Finish” button to finalize the setup.
Before you edit the appointment booking forms, you need to interrelate the Providers and Services posts. Open a Provider’s post and find the Related Services tab in the left sidebar. Type three characters into that text area and pick the necessary service once the system suggests it.
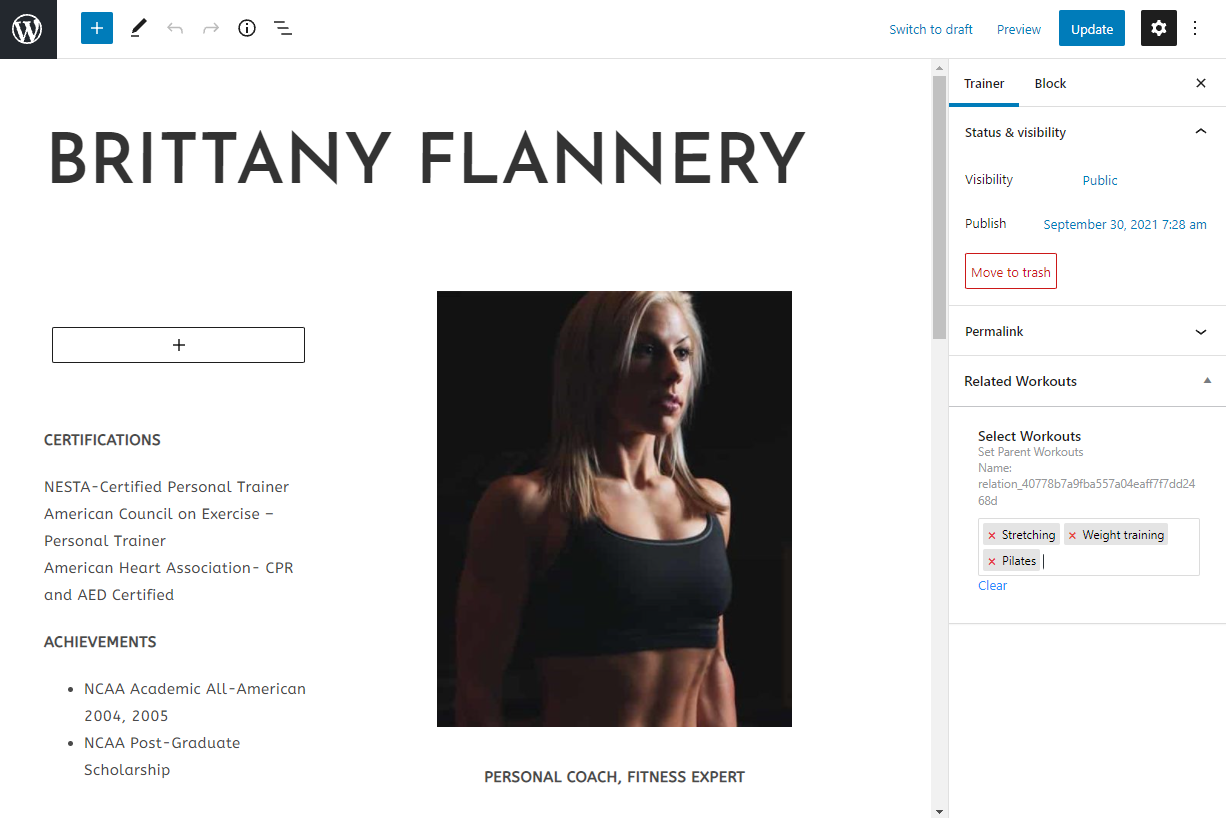
Repeat the procedure as many times as there are dedicated Provider posts. Once done, you are ready to play around with the forms.
JetFormBuilder and form addition to pages
What’s excellent about Crocoblock products is that some are actually free. Take JetFormBuilder. It’s a WordPress form-building plugin allowing site developers to build dynamic forms in the Gutenberg page editor. You can download the plugin, activate it, and use it right away.
Go to JetFormBuilder > Forms. The two generated forms will be there. We’ll have to edit them since we added two columns to the DB table during the appointment setup. Now, we need to add the necessary meta fields to the form and post-submit actions.
Click to edit the Static Page Booking Form and add the missing meta fields by drag-n-dropping the corresponding Gutenberg blocks. We’ll need two – a Text Field and a Textarea Field – to add the Phone and Comment fields.

Next, you need to input these fields into the Post Submit Actions. To do so, press the JetForm tab, scroll down to the Post Submit Actions section, and click on the pencil icon below the action name. You’ll see a Post Submit Action editing window, where you are supposed to select the form fields where they belong.

Besides that, you can set up WooCommerce integration here, provided that you’ve enabled it at Step 4. Once done, click the “Update” button.
Quick tip. Feel free to add several Post Submit Actions at once but ensure that their conditions do not contradict one another. In that case, the form submission will fail.
Once you finish customizing the Static Page Booking Form, update it and add it to the website page. We’ve created a dedicated All Workouts page, which shows a dynamic JetEngine Listing. A booking form will look lovely under the grid.
Open the page where you wish to place the form, find the JetForm block in the left sidebar, drag and drop it to the desired area, and then pick the form you’ve just edited in the Choose Form drop-down on the right sidebar.
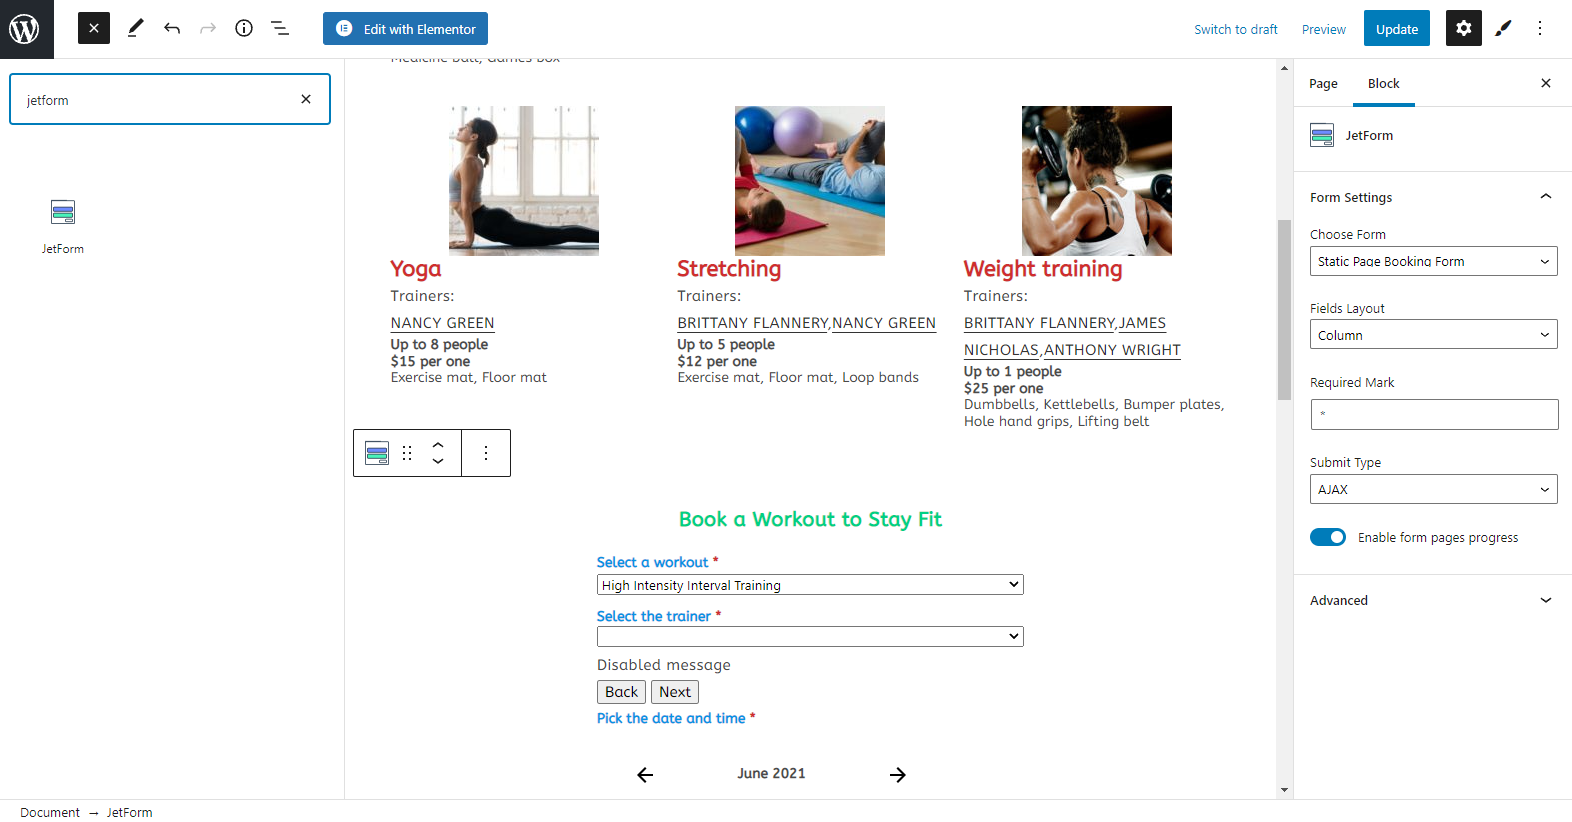
Update the page and see how it looks on the front end.
Now, the most attentive readers are like, “How come the form is styled-up?”. That’s because we’ve thrown another plugin into the mix. Keep reading to find out which. 🙂
Go back to the WordPress dashboard and open the Appointments > Appointments pathway. There you have it – all appointments are sitting tight. You can view, edit, delete them, filter, and change their status here.
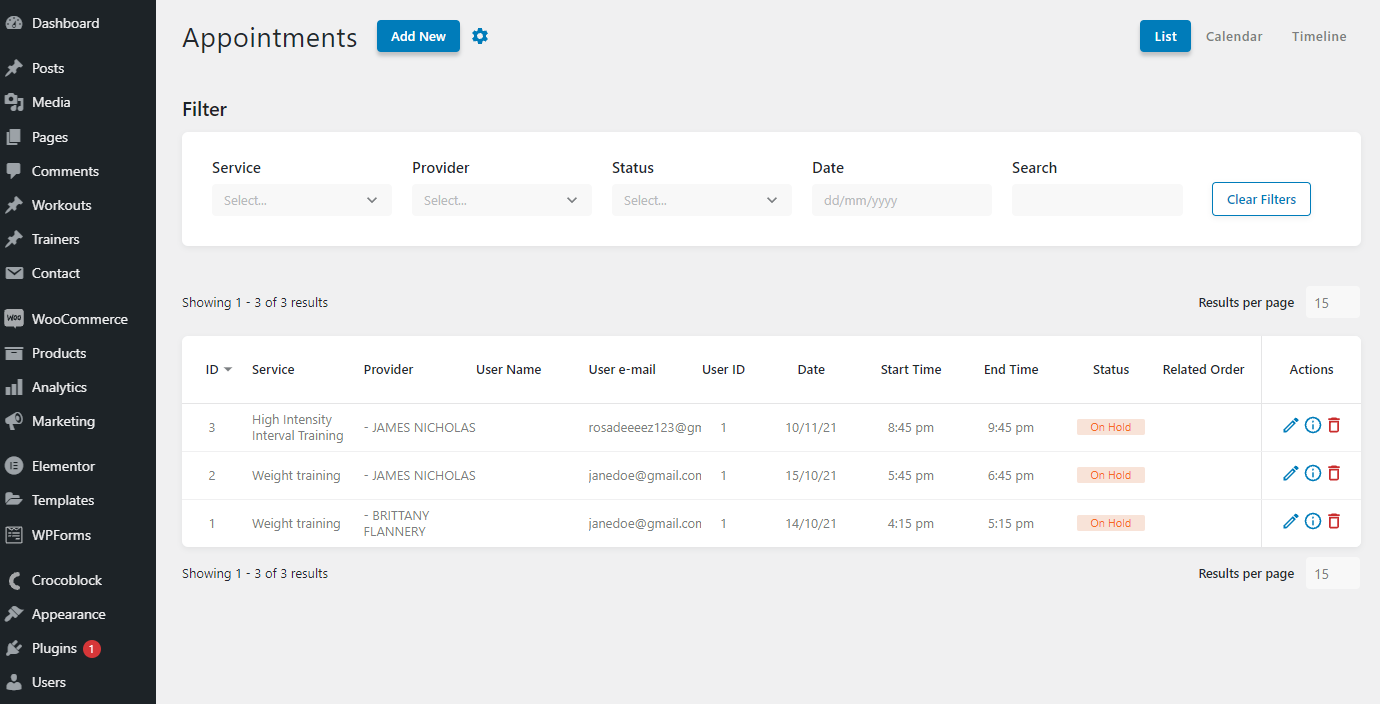
As you can see, the appointment booking functionality is up and running. However, there are more things you can do to make the appointment scheduling website even more dynamic.


Hello, Thanks for your article. it was very helpful for me.
Hey, I’m so glad it was helpful for you. Thanks for sharing your feedback 🙂
I feel very fortunate to have read this abif. It has everything I need, these instructions are very helpful to me. Thank for your writting
Awesome! Appreciate if you can share your results in OceanWP or/& Crocoblock community. Thank you for sharing your thoughts 🙂
Finally, I have decided to upgrade my Oceanwp free subscription to a pro subscription. I have been working on this free theme since Oceanwp’ss launch. The Oceanwp website I have created since its inception is… Thank you Oceanwp Team…. with love
Informative Article. I am very glad to read this excellent post.
Wow, this is really great. I think this is one of the best blog posts that has ever been written. Your work is of a very high quality. It’s very important.
Thank you a lot!
Thank you for sharing an informative article. It’s very helpful for me. Keep sharing!